Pine cone drawings will be covered in 4 variations in this article! In ancient times, the Pine cone symbolized courage, fertility, and immortality. A bump is nothing but the fruit of a Pine.
This fruit ripens on a tree for more than one year and throughout its entire life, gains a considerable amount of vitamins and minerals. Pine cone drawing easy to do; the main thing follows our prompts!
The life of the bump begins in early spring with a small pinkish shoot, similar to a pea. Over two summers, the cone reaches its maximum size, after which it becomes brown and stiffens so that it opens up and get rid of seeds the next year. Young cones are rich in essential oils, iron, magnesium, and other trace elements.
Few people know that there are male and female Pine cones. Male fruits produce pollen and bloom in early summer, while female fruits are the same fruit that we used to call the Pine cone. Let’s get down to pine cone drawing!
Pine cone drawing easy (option 1)

Step 1
First, we draw the outline of the bottom row of the pine cone!

Step 2
Next, draw the outline of the next row of pine cones!

Step 3
Now let’s draw the next row of pine cones in the same way!

Step 4
And in this step, we’ll create the outline of the third and fourth rows of the pine cone!

Step 5
Next, we’ll outline the next rows of pinecone bumps!

Step 6
Let’s sketch some elongated pine cones—or rather, their outlines!

Step 7
Carefully draw the top few rows of the cone, which are slightly curved!

Step 8
And we finish drawing the pine cone with its tip!

Step 9
At this stage, we’ll draw the outline of the pine branch!

Step 10
Let’s draw the underside of the pine needles!

Step 11
Draw the top part of the pine needles the same way!

Step 12
Let’s start coloring the scales of the pine cone in shades of gray!

Step 13
And with this step, we’ll finish coloring the entire pine cone in light gray shades!

Step 14
We’ll give the central shoot where the bud is growing a gray tint!

Step 15
And here, we’re simply coloring the pine needles on the pine cone green!
How to draw a pine cone in pencil (Option 2)
 Well, you found out exactly how to portray bumps in excellent detail. Currently, think about the distinction between pine as well as spruce. In numerous scenarios, both of these skills will come in useful. Allow’s begin with exactly how to attract an ache cone.
We begin by obtaining the all-natural form. To do this, attract a quantity cone. We are making use of arcs, round the reduced, and also upper parts of the number. We get a ball prolonged up.

We start to draw the contours along the edges. We are trying to add some crookedness that exists in nature — after that all-time load low, relocating to the top as well as increasing the gaps in between the scales after we remove the side contour with an eraser.
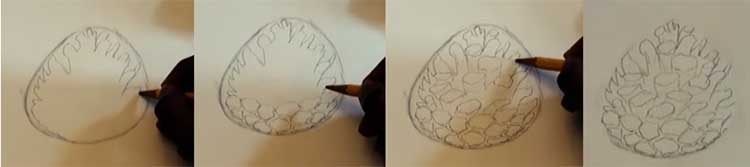
We are reaching the coloring. We will certainly require black, dark environment-friendly and also brown pencils. The first to load the space between the ranges, add shadows to the environment-friendly, as well as fill up the remaining voids with brown. We eliminate the extra questionable information; if desired, we circle a thin black felt-tip pen or pen.

Pine drawings simple (Option 3)

Phase 1

A few lines indicate the branches.
Phase 2

In the middle, we draw a vertical oval.
Phase 3

We provide volume to future branches. We use oblique hatching for the image of flakes.
Stage 4

We draw dense needles on each paw of the branch.
Phase 5

Erase auxiliary lines. At the place of the oblique hatching, we make roundings to make sure that it appears as if the ranges extend along the edges.
Phase 6
Color the resulting image. Fill each needle with environment-friendly, attract a dark green summary for the volume. We repaint the bump in brown. Blackmark the places that are most obscured.
Cone drawings realistic (Option 4)

Fir cones vary from ache cones in a much more lengthened form as well as much less great ranges. Let’s see exactly how it will search in the picture and consider how to draw a fir cone as part of our lesson.
For clearness, we also took a natural fir cone to follow all dimensions as well as proportions. We attract a straight line – the basis of the picture. Below we draw a factor, as shown in the example.

We start to show three ranges from bottom to top. We try to maintain the size as well as balance.

In the upper part, it is needed to show some narrowing of the size of the cone. With the help of dense hatching, we show darkness, draw shapes. Get rid of excess lines.

How to draw a pine cone (Option 5)

For a beginner artist, it is important to learn exactly how to communicate the structure of the shown object, without being distracted by colors as well as bordering components.
For that reason, additionally, we will demonstrate how to draw cones with a pencil to obtain a right and also clear illustration. All you require is a white canvas, a sharp pencil, an eraser, and even your inspiration.
So, for beginners, we will undoubtedly make a markup on the sheet where our cones will undoubtedly lie. Let one be a little tilted to make involved the structure. The format is rectangular with a few rounded corners from an all-time low.

Next off, within the marked locations, draw the line of the center. Symmetrically on both sides, we draw a range of the base of the scales, as displayed in the figure. Someplace you can already detail their form. Attract strokes of the surface of the assistance from listed below.

We start to draw each flake along the contour lines. Note that they are denser at the bottom than at the top. Attempt to attract quantity with hatching. The lower part of the ranges ought to be darker, considering that light is much less likely to fall on it

We brilliantly circle the needed lines; we erase the complementary lines with an eraser. If preferred, you can highlight the information with a gel pen.


