Cowboy drawing in 3 versions will be described in this article! Cowboy is the name used in the Wild West of the United States about cattle herders. The era of cowboys began in 1865, when it was necessary to drive giant feral herds of bulls into theft, mainly in Texas. This era ended about 20 years later. About a third of the cowboys were African American, freed after the Civil War, but without work or property. Another third of the cowboys were Mexicans, and a third were descendants of immigrants from Europe.
The word cowboy itself, consisting of two words – cow (cow) and boy (guy), literally translates as “cow guy.”
It is known that it was hard, grueling work with meager pay. Almost half of them were of African, Indian, or Mexican roots. Many cowboys had to hire horses for their work from the rancher. Cowboy drawing an easily; the main thing is to follow our recommendations!
The mere mention of the profession of a cowboy forces the imagination to paint pictures of the wild corners of North America: endless plains, herds of cows, horses, and in the foreground – brave men with imperturbable chapped faces. Dressed in jeans, plaid shirts, and hats, shod in boots, these tough guys deftly wield the lasso, pacify wild bulls and mustangs, and shoot well-aimed revolvers.
The history of professional shepherds on the North American continent is only 150 years old – it began immediately after the end of the war between the North and the South.
So let’s get down to drawing our cool Cowboy right away!
Cowboy drawing easy (option 1)

Step 1
The first step in drawing a cowboy is to draw the outline of his head!

Step 2
Next, draw the outline of the upper body!

Step 3
We also draw hands without hands and finger phalanges!

Step 4
At this stage, we draw the lower part of the body, or more precisely, the legs with the outlines of cowboy boots and, of course, a stone to make the picture more beautiful!

Step 5
Let’s draw the hands and fingers of our cowboy!

Step 6
In this step, we will draw a cowboy hat and the outlines of the mouth and eyes!

Step 7
Next, we draw the rifle and cowboy pistol more accurately!

Step 8
We also draw a holster for the pistol and a cowboy belt!

Step 9
Next, we draw the facial features on the cowboy hat!

Step 10
Here we begin to draw detailed outlines from the muzzle to the handle of the cowboy’s rifle!

Step 11
In this step, we will draw the gun pocket in more detail!

Step 12
We drawing the face and add more precise contours (eyes and mouth)!

Step 13
And in this step, we drawing our cowboy’s rifle!

Step 14
In the same way, we add bright shades to the jeans, boots, and stones in our drawing!

Step 15
Let’s finish the drawing by coloring our cowboy’s shirt!
Cowboy drawing illusion (option 2)

Let’s try to draw a cowboy; although this character is not very popular at present, he still occasionally pops up in films (“The Lone Ranger”) and cartoons (“Toy Story”). Let’s give it its due and try to translate it into an accessible form. We start drawing with a circle. We draw a small circle, under it another one (like a snowman), then draw four lines down from the lower ring; two are curved in one direction, two in the other.

Finish off our Cowboy’s pants by limiting them at the bottom. Let’s draw the arms and the top of the hat in a very distinctive silhouette.

Now add the ears to the head, arms to the sleeves (for now, mark them with ovals), and legs – we have them in the form of trapezoids.

Let’s take a close hat. We draw the brim of the hat and a line on the forehead of our Cowboy, indicating the border of the hat worn on his head.

How to draw a traditional cowboy outfit. Its distinctive features are a belt and a scarf. We also draw the boots. We outline the thickness of the sole; the nose bent towards the top and higher – two lines denoting the spurs worn on the shoes. Everything is shown in the figure.
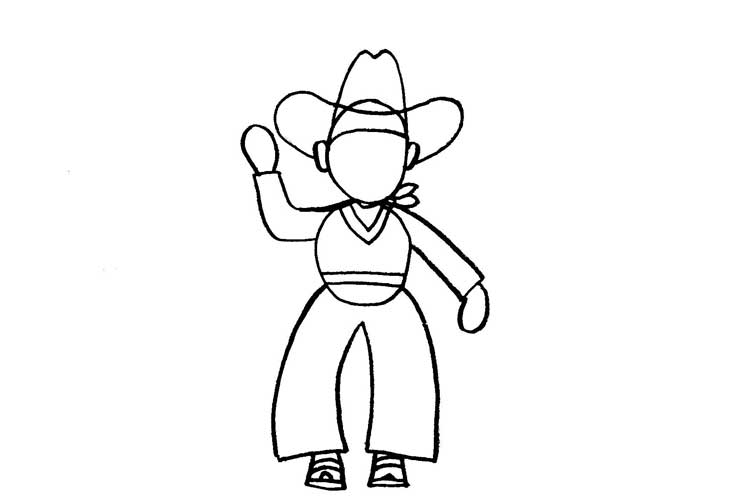
We draw a face according to a simplified scheme.

Two of the Cowboy’sCowboy’s favorite items that he is known to never part with are the pistol and the lasso. Here we depict them in his hands, on which we also draw fingers.

That’s all, we erase the extra lines and add nuances – cages on a shirt, trim on trousers, and a fool for mischief, we have a very young cowboy, practically a boy!
That’s all, not the most accessible lesson, but I think it quite interesting! Good luck with your drawing!

Cowboy drawing step by step (option 3)

1 Head
We depict the oval head of CowboyCowboy Woody.
Auxiliary figures

2 Torso
Draw the Cowboy’sCowboy’s torso and arms.
Body shapes

3 Cowboy hat
The cowboy hat has a wide brim. Shape the Cowboy’sCowboy’s face.
 Woody – sleeves, and collar.

Additional details
4 Clothing details
Draw the Cowboy’sCowboy’s legs

Woody finish the oval buckle belt and boots.

Woody Boots

5 Footwear
Also made up of small parts.

6 Hero face
Draw the details of the cowboy’s face: eyebrows, eyes, nose, mouth, ears.

7 Finishing the drawing
A little more, and the drawing is ready.

Cowboy Look Details
When drawing the cowboy face, you need to be very careful since this stage is the most difficult. Don’t miss anything.

8 Color
You can color the cartoon character in the version that we offer or show your imagination and paint in other colors.


