Drawing a woman’s body or a person is a complex subject, but any complexity can be broken down into simpler, more understandable steps: take one step at a time, rather than jumping up the whole staircase at once. When drawing people, we will also follow this principle, moving from simple to complex. The main rule is: don’t try to do everything perfectly. The most important thing right now is to simply try and learn.
Drawing a woman body or people studying proportions
Maintaining proportions helps the drawn person look “right”: our brain is good at sensing when “something is wrong” with a disproportionate figure, even if it cannot determine the specific reason. It’s all about our extensive experience: we constantly see people from early childhood and intuitively know the correct body proportions. Stylization is a separate case, but it’s too early to discuss it now.
To use this knowledge consciously, you need to analyze the proportions and practice using them until they sink in.
Basic women or human proportions. They are measured in heads — how many times the height of the head fits into a certain part of the body:
Reference points and connections in the body will help you remember and check the proportions:
This is an idealized average. In reality, people’s proportions vary — for example, the height of a particular adult will accommodate seven heads, not eight. But this diagram is an excellent starting point for understanding the most important proportions of the body, and only then delving into the nuances.
Female body proportions.

They are basically similar. The main differences in women are that:
- their shoulders are narrower than men’s;
- their hips are wider.
- their waist is slightly higher.
Practice. The best way to remember proportions is to draw them many times. Start by drawing on a grid — use a person standing upright for this. Remember: move from simple to complex.
How to do it.
1. Take a horizontal sheet of paper. Any horizontal canvas format will work for the figure — for example, 2000×1600 pixels. Draw a straight vertical line on the left side of the sheet. It should take up almost the entire sheet, but with small indents of a few centimeters at the top and bottom of the sheet.

2. Divide the vertical line into eight equal parts. It is not necessary to measure them down to the millimeter; you can do it by eye. From each division, draw a straight horizontal line to the right—these will be your proportion guides.
If you are drawing digitally, don’t lose these markings — they will serve as your template for sketches later on.

3. Inside the resulting grid, sketch the human body:
Draw a center line as a base on which to “string” the figure.
Next, depict the person according to the proportions described above: place the head in the top division, the torso in the second and third, and so on. At this stage, you don’t need to draw the entire body: draw the approximate shapes of the chest and pelvis as shown in the picture, and depict the limbs with lines. This is enough to remember the proportions and not be distracted by anything else at this point.
You will end up with a stick figure like this:

The example below shows a drawing divided into 3 parts! A sample with an 8-part division will be created later!
Drawing a woman full body

Work Stages:
Photo 1. First, you need to draw a vertical centerline with a simple pencil. At the edges of the segment, leave serifs. They will determine the total height of the body beyond which you can not go:

Photo 2. Divide the segment in half. Thus, the line is divided into two parts, along which we will later build the body. Next, divide the upper portion in half again, and measure another half from the resulting top section. The first segment is the height of the women’s head:

Photo 3. Now you need to outline the location of the shoulders. The shoulder line will be under the head, namely under the second (top) notch. Step back a little from the head, leaving a small space for the neck. Draw a line of the shoulders at an angle, because the woman will be leaning a little:

Photo 4. Next, we need to find out the place of the waist and knees. To do this, divide the center line into three parts. To do this easily, we share the lower half of the centerline in half, but the front of the knees will be slightly higher. We measure its height and transfer it to the centerline three times, leaving serifs. The result should be three equal parts:

Photo 5. Now we outline the waistline. It will be located on the notch between the first and second half of the divided center line (there are three parts in total), and the hips are slightly lower and twice as wide as the waist. We draw the bones and the size at an angle, opposite the shoulders:

Photo 6. Combine the shoulders and the waist at the edges, and from the waist draw a line to the hips. It is necessary to outline the length of the skirt – it will be equal to two distances from the waist to the hips:

Photo 7. From the shoulders, we outline the location of the hands. The left-arm will be bent at the elbow and located at the waist level, and the right arm will be raised and set aside:

Photo 8. Now draw the legs. Do not forget that the knees should be located at the notch level. The right leg will go a little beyond the left:

Photo 9. We draw the head in the shape of an oval, and on it “outline” the hair. Most of them will fall to the left side:

Photo 10. Draw our hands and give them shape. The girl will hold her left hand at the waist, and her right hand is set aside:

Photo 11. Next, draw women’s clothes. She is wearing a striped T-shirt and skirt. We outline bends and folds on the fabric:

Photo 12. Using the eraser, delete the extra lines that were previously needed for the construction. Strengthen the contour of a women’s body:

Photo 13. Let’s draw the facial features of a woman. We do not place much emphasis on face painting, because our main task is to learn how to draw a woman to her full height, namely, the body. You can study my separate lesson “how to draw a woman’s portrait”, where I elaborate on the details of the women’s face:

Photo 14. Let us set the tone for the hair. Near the bends we make the pencil strokes denser:

Photo 15. Now we draw the upper body of the woman: arms, chest, and face. Draw the stripes on the shirt:

Photo 16. The skirt will be dark, so we make the tone like hair:

Photo 17. Next, draw the legs. We apply strokes by bending the legs. On the lower part of the legs (under the knees), we make the tone a little darker:
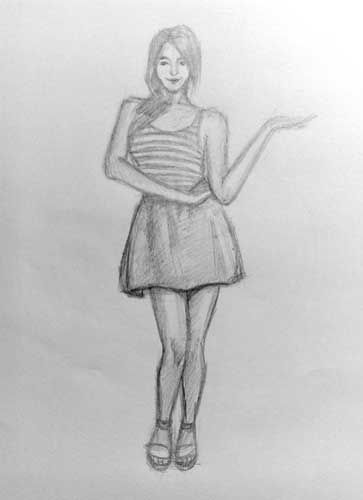
Photo 18. The last stage remains. On it, we add contrast and select the body contour. We refine the missed steps. The drawing is ready.
At first, glance, drawing a full-length woman seems very complicated. And one cannot but agree with this.


