Drums drawing in 3 versions is described in this article! The first drums appeared around 3000 BC! Shamans initially used them for rituals. Indian tribes made drums from gourd and wood, and the Maya from wood and leather. During the Middle Ages and Renaissance, drums were used by the infantry to send encrypted messages to soldiers.
And playing the drum is also very useful: half an hour of playing this instrument burns more calories than the same half-hour of cycling and reduces stress harmonics. (nerves? A mess at work? play the drum, let the neighbours stress for you!)
Today you will learn how to draw a drum – one of the oldest musical instrumentsю
In this lesson, I will show you how you can draw a drum with your child’s pencil. The step-by-step study is divided into seven simple steps that will make the drawing process easy and straightforward.
Let’s get down to drum drawing.
Drums drawing easy (option 1)

1
The basis
Beginning with a base, which will undoubtedly be a tiny oval. Given that we are drawing the drum from the side, it appears that it is oval.

2
Volume
Attract another oval below; part of it intersects with the very first shape.

3
Unneeded lines
Get rid of the part of the second oval that converges with the initial.

Exactly how to draw a drum Get rid of half of the bottom oval. The remainder appears like a smile.

4
Compound
Now connect the drum get rid of 2 straight lines.

5
Bezel
Different the drum edge from the drum head using rounded lines.

6
Patterns

The reels commonly feature a triangular pattern. You can use a leader to draw or have your youngster discover to draw straight lines by hand.

How to darw a drum Include one more broken line. These tough darts are made use of to connect the drum parts.
7
Drumsticks
Drumsticks are important with which people play the tool. Note that a person’s side of the sticks is revealed as rounded. 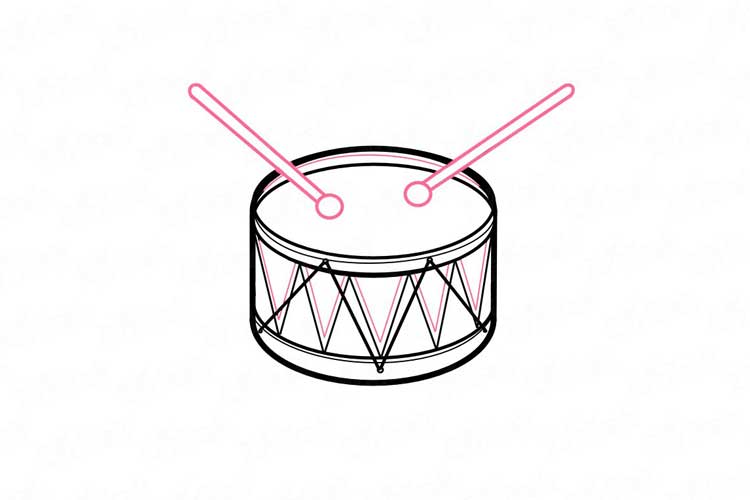 8
8
Colouring
The top of the drum might remain white or paint it light gray. For patterns, you can choose shades with your child at your discernment.
Drums drawing At Home (option 2)

Step 1
If you look at the drum from the side, it will be square. But from above, this wonderful tool looks round, so first, we will draw a base in the form of a rectangle.

Step 2
Now draw two ovals on top of this rectangle. The top side of the bottom oval will be hidden, so draw only half.

Step 3
Let’s add volume to the tops of the drum using additional lines. You should have it like this.

Step 4
Now we need to remove the different baselines, we no longer need them.

Step 5
We are decorating the drum. I added zigzag lines on the sides and a couple more lines on the top to keep the drum from looking flat.

Step 6
It would help if you had sticks to play the drum, so let’s draw them. Drumsticks look like simple drumsticks, but they expand slightly at the ends.

Step 7
Let’s add a few details – shading, an illustration of the “sound” coming from the drum, and so on. You can add shadow and colour the drum to your liking.
Drums drawing set (option 3)

1. Let’s represent a musical instrument in the form of a simple shape – a cylinder. So we draw an oval. We draw him two lines down and connect them with an arc. We get the body of the future drum.

2. Make the top, bottom and inside thicknesses to get some of the drum finish. Draw triangles in the central part.

3. Draw the strap and some small parts of the drum.

4. Let’s also add sticks to the drawing, with which it will be possible to get the sound on such a fascinating musical instrument. Let’s draw them in the form of circles from which we draw lines. We connect it with a small arc and adjust the overall shape.

5. Start painting with watercolours with red. It comes in handy for a long strap and red triangles on the center of the drum.

6. Paint over the instrument’s stripes and small details for stretching the membrane with yellow and brown watercolours. Also, these shades are useful for creating a shadow of wood on sticks. This is followed by a green tint, which we mix with brown. Paint over the side triangles and the central part of the drum.

7. Darken the drawing. Therefore, we use carmine, black, dark brown.

8. We work out the drum drawing with sticks with a black liner, which should have a thin black rod. Here is such a drawing of a musical percussion instrument, which is called a drum. The figure also contains two wooden sticks, with the help of which a person strikes the drum membrane at a particular beat and rhythm to obtain sounds.


