How to draw a peach in 3 option will be described here! The peach tree belongs to the genus of plum. Its fruits are very juicy and tasty. In this lesson, we will look at how to draw a peach with a pencil in stages.
Let’s draw a whole peach with a leaf and a half with a bone. The easiest way to create drawings is to use a dull pencil.You can draw with paints or colored pencils, but then the method of creating a picture will be completely different. So how to draw a peach?
How to draw a peach (option 1)

Draw a circle, then the top of the peach and leaf. Then we draw a bone of the other peach to the left in the middle of the first.

Draw the pulp of the other peach.

Make hatching of the bone and the dark area of the pulp around it.

We draw holes in the bones with a darker tone and darken places around them, then we make a more shaded area, which is reddish on the original image, the flesh itself is depicted with light lines in the direction, see the drawing, paint the bottom.

Now we go to the first peach, in a dark tone we make the bottom shading, a little lighter on top.

Shade up in a lighter tone, draw veins on the leaf.

Because the first peach turned out dark, the second we make more contrast, we make the bone and the flesh around it more mysterious, also the peach skin. Our first peach is not perfectly round, so we slightly adjust the contour, add shadows from two peaches.

You can leave it as it is, but you can either fleece or shade our lines with paper, as we did in the apple drawing lesson. Where you need to make a darker tone, again apply shading and blend, where lighter – use an eraser (eraser). The bone can not be shaded at all; it can be shaded, but only very carefully.

Peach drawing (option 2)

First, draw a whole circle and half. In half, we do not forget about the bone. We outline the top edge of our entire peach.

Outline the lower half of the peach.

Now you need to draw a groove. Do it on a whole peach from top to bottom.

We draw a notch under the stalk on the whole peach, and on the half – a bone, highlighting its uneven gyrus.

We draw very thick lines of roughness on the surface of our peaches.

Take the eraser and erase all the sketches.

It remains to color the peaches …
Peach drawing (option 3)

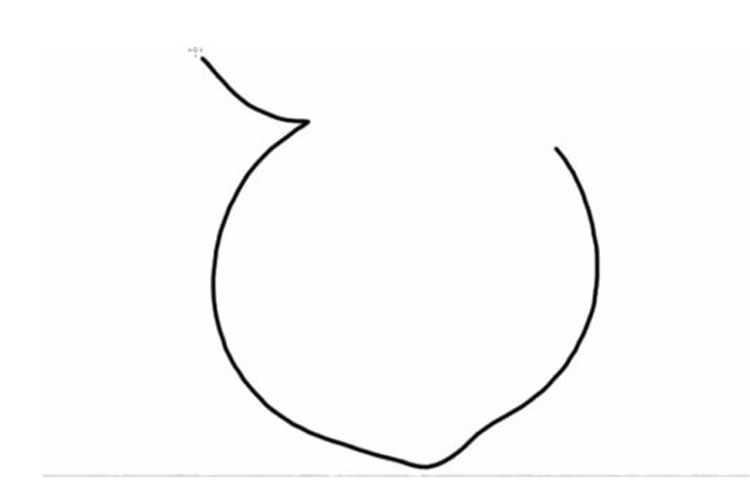
We start from the top right corner of the fruit. We make an elongated semicircle, which makes a slight bend closer to the bottom. When the pencil approaches the imaginary center of the bottom of the fruit, you should begin to draw the left semicircle. We do it without bends.

Not bringing 0.39-0.5 inch to the center of the apex, we begin to draw apiece. Usually, it has the shape of a slightly elongated ellipse, without curved edges. Some paint them; others don’t. This drawing will be with smooth lines.
To do this, from the last point of the peach, with a pencil, draw a smooth curve to the left, then continue the line of the sheet another 0.39 inch in a straight line.
After that we draw the upper part of the sheet, moving along the curve of the elongated ellipse almost to the middle of the top of the peach.

According to this principle, the sheet is located on the left side, and the wand is to the right.
After that, at an angle of 45 degrees, draw a straight line and bend it in a semicircle up, back down to the beginning of the wand.

It remains to connect the last point of the sticks to the right side of the semicircle of the fruit. We draw with a pencil a smooth bend before joining with the right spot.

Peaches have a characteristic separation along with the fruit. Draw it. So, it will be easier to distinguish the peach from the apple. The bottom of the wand is not limited from the fruit itself, so we begin to draw from the left side of the wand, closing this void and moving along the curve slightly to the right and down.

Not bringing the line to the middle of the peach, you should skip 0.39-0.5 inch and continue the trajectory of the curve until it touches the bottom notch.

After that, continue the line deep into the middle of the bottom of the peach.

It remains to divide the sheet into two parts of a smooth curve.

The figure is ready. It remains to paint over the peach and leaf with appropriate colors. It should be borne in mind that the left side of the fruit is most illuminated, so it will be brighter, and closer to the right half you need to select a dark color.
More advanced artists can be advised to draw a shadow under the fruit. Here you need to take into account the direction of light. Since our light comes from the left, the shadow will be located on the right. It is made slightly elongated. The realistic and more colorful drawing looks using different shades and colors, their combination. But this is a difficulty level.