How to draw a sphere, three-dimensional shapes similar to cubes and spheres are large practice for artists looking to sharpen their methodological drawing skills. If you can draft, draw, and ideal scenery most essential shapes on the article! In this step-by-step tutorial, we’ll learn how to draw a sphere, which includes forming an ideal ring and shading properly.
To understand the essence of drawing a sphere

And the cause is that the techniques you’ll learn to create a smooth circle look like a 3-dimensional sphere, are necessary for all kinds of items and topic matter – from the more clear apples, oranges, and onions, to the less observable human figure. Where this work out demonstration its worth though, is for portraiture. Learning how to draw a 3-dimensional sphere and how the illumination and shadows interaction with every new, will assist you «observe» the organization of someone’s top and features more obviously.
Stages of drawing a sphere

And secure form though it may be, if you’ve struggled with this kind of thing in the history you will get a real sense of approval when you get all the lights and darks in the right rest.
If, however, decided to read further, then proceed. In the process of learning to draw a critical stage is the image of simple shapes, for example, a ball. How to draw a ball in pencil step by step? First, you need to make a copy of a circle, and then mark the light and shade with hatching.
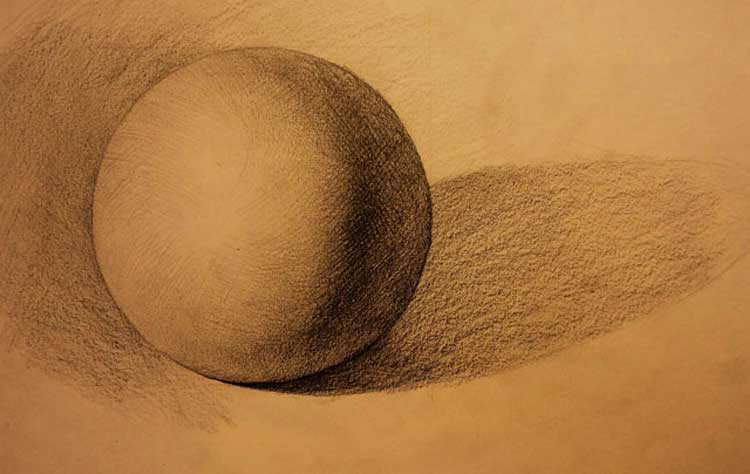
How to draw a sphere with a pencil (option 1)

Step 1
First, we draw one vertical line and another horizontal line so that they intersect as shown in the figure!

Step 2
Next, make marks along these lines so that you can then connect these marks and draw a circle!

Step 3
And in this step, we draw a circle with a radius of about 2-3 cm!

Step 4
At this important stage, we determine where the light will fall (in this case, it will fall from the top left)!

Step 5
Here it is important to understand how shadows, flash and lights will be positioned on the sphere! Light, shadow, half-shade, and flash should always be arranged in an elliptical shape!

Step 6
Draw the direction of the light and sketch part of the sphere, and for ease of understanding, on the right, how the sphere should look in ideal terms!

Step 7
At this stage, we draw the central part of the ellipse in the form of a small circle of light (it will be fully visible, unlike other elements that are hidden from us behind the ellipse).

Step 8
Next, draw the light in the very center of our drawing and the half-shade!

Step 9
In the same way, we create the outline of the lower part of the sphere, namely the shadow part and its elements.

Step 10
At this stage, we begin shading!

Step 11
Erase the central part of the sphere and start drawing the lines from the bottom! We shade according to the shape of the shadows!

Step 12
Draw the outline of the falling shadow and draw the shadow itself!

Step 13
At this stage, we draw the shadow: the front edge is more saturated, and the rear edge is less saturated.

Step 14
Apply an additional layer of hatching at an angle to shade the side of the sphere!

Step 15
Here we apply vertical hatching!

Step 16
And in this step, we mark the penumbra and darken the edges of the sphere!

Step 17
Finally, draw the boundaries of the sphere, finishing with the flash!

Step 18
And apply hatching at a horizontal angle to the left and above the sphere to add texture to the drawing!
How to draw a sphere 3d (option 2)

The light source is located in the upper left corner. Set the guides from it and draw the shadow from the ball. Draw a curve on the ball that defines the dark area.
Step 1
Draw a circle and next to it an oval-shaped shadow outline.

Step 2
Apply eyeshadow.

Step 3
Add a shadow and a lighter tone for the reflection (the part of the shadow that is lightened by the reflection from another surface).

Step 4
Add saturation and shadows.

Step 5
Continue adding light shadows to the light area of the sphere where the light falls.
Step 6
Add hatching.

Step 7
Blend for smoothness of the object.
How to draw a sphere easy (option 3)

Necessary materials draw a sphere :
– paper
– graphite pencil.
Step 1
Draw a smooth circle – this is the base of the ball. Spend a straight line in the center of the sheet. Put a dot in its center. Through it, draw a straight line perpendicular to the first, of the same length. Try to make the lines barely noticeable.
To understand where the center of the sheet, while you can use the ruler, but better develop the eye – in the future it will be useful to you more than once.
one
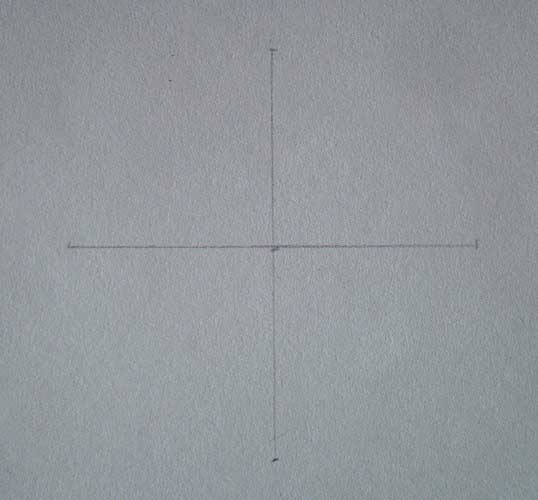
Step 2
Connect the extreme points of the resulting intersecting lines, forming a circle. You probably won’t get a flat circle the first time, but don’t give up. When you’re done with this task, erase the extra lines.

Step 3
Create volume by overlaying shadows. Suppose the light falls from above and to the left. Put a dot in the most bright part of the ball and mark the width of the shadow with a dash.

Step 4
Now you need to draw the diameter of the ball through its center, perpendicular to the direction of the incident light. By the diameter cut, draw an ellipse denoting light-shadow borders.

Step 5
Conventionally, the ball can be divided into several parts following the degree of illumination. Some part is heavily lit, some – weak, some – darker, and the fourth – entirely in the shade. These areas, different in illumination, it is better first to imagine mentally (if this is difficult, you can set a spherical object in front of you). The most illuminated place that reflects light is a highlight. You can remember him, but you can mark on the sheet.

Step 6
Surrounds the highlight of the bright spot. Then there will be a gradual transition from light to shadow and, finally, the most shadow area. Draw a shadow with curved strokes.
Step 7
It’s time to hatch. Do not touch the highlight area, fill the light field with light gray. Make the hatching color darker in the shadow direction. Do not forget about the arc-shaped strokes parallel to the contour of the ball, and then diverging radially from flare to shadow. Reflex make more light in comparison with the falling shadow.

Step 8
Make an image of the shadow cast by the ball to the surface. With artificial light, it will be more clear, with daylight – less clear.
eight

Step 9
If necessary, add a subject plane and background.
Congratulations! Now you know how to draw a sphere in stages.


