How to draw a baby easily and simply in 3 step-by-step versions in this article! At first glance, it may seem that drawing a baby is simple. However, practice shows that you need to start drawing newborns from abstract children’s portraits and figures, having previously studied the proportions and memorized simple diagrams given in step-by-step lessons. Today, with the help of a detailed step-by-step lesson, we will learn how to draw a baby with a pencil.
The article describes the steps of building and creating a shadow. A portrait of a baby differs from an adult in its parameters. Eyes and cheeks will be more expressive, and nose and lips – less. So, let’s proceed to the drawing and find out how to draw a baby correctly.
Let’s try to draw a baby, even though this is not an easy task: the baby is always on the move, and only experienced artists manage to draw them from life. Infants are a popular subject in art. This is explained by the ability of babies to arouse admiration and affection in those who are watching them.
Let’s draw such a nice baby here:
Baby drawing (Option 1)

Step 1
When we start drawing our baby, as is often the case, we create a slightly elongated circle vertically!

Step 2
And in this step, we draw an even circle in the first circle for convenience in drawing facial features!

Step 3
Here we draw eyebrows, a nose, and lips for our baby!

Step 4
We also create the outlines of the eyes using the selected parallel lines!

Step 5
And in this step, we draw the handles of our sweetheart!

Step 6
Next, let’s draw the outline of our hero’s shorts (diaper)!

Step 7
Draw cute little legs for your baby in the same way!

Step 8
And at this stage, we draw the detailed outlines of the little hands!

Step 9
Draw precise, detailed outlines of the eyes, consisting of the iris and the center of the eye! Also draw the eyebrows!

Step 10
Let’s remove the extra lines on the front of the baby’s face!

Step 11
Let’s start coloring the baby’s body!

Step 12
And we finish coloring the baby with his shorts (diapers) and beautiful eyes!
How to draw a baby (Option 2)

The lying baby looks very cute. Let’s try to make such a picture.
The baby lies on the scales. In a small child, the ratio of the size of the head about the body is much smaller than in an adult. Do not forget about it. Also, you will need to take into account the cute infant swelling.
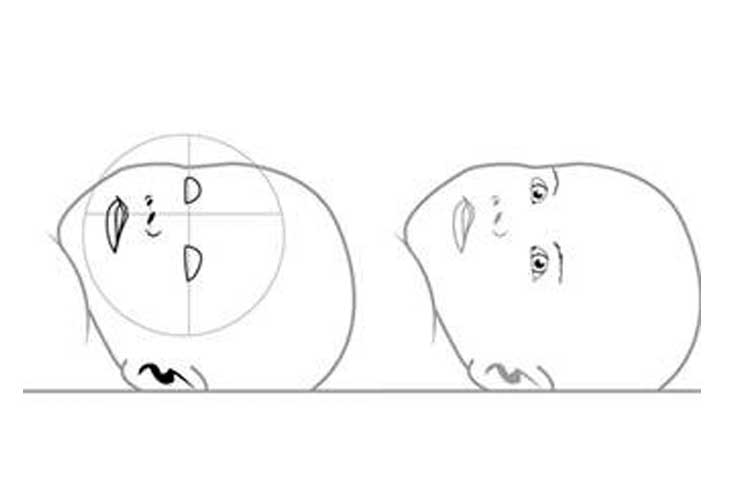
First, draw a circle. On it, as well as in the previous master classes, we outline the part on which the little face of the kid will settle down.

2. As we draw a reclining infant, mark the eyes, nose, and mouth on the left side of the circle. Do not forget the proportions.
3. Draw the outlines of the head around the future face and mark the lower part of the surface on which the child lies. Let it be, for example, children’s scales.
4. Then you already know how – eyes, nose, and mouth. Yes, still a little ear.
5. Now we try to draw a body step by step. First, mark them with simple lines – how are the arms, legs, and body. Since the baby is quite small, his neck is entirely invisible.

6. Then draw the breast and pens. More roundness, on the wrist, you can draw a fold.

7. Next, a line of cute plump legs.


8. Now draw the contours of children’s scales.

9.The resulting pattern can be shaded, shaded and painted.
Baby drawing (Option 3)

How to draw a baby with a pencil
Tools and materials:
White sheet of paper;
Pencils (hard and soft);
Eraser.
Stages of work:
Photo 1. At the first stage, using a simple pencil, sketch a rectangle without using rulers. Making a drawing by hand:

Photo 2. We calculate the size of our form. The height of the rectangle should fit a width of one and a half times, which means one and a half of the height. If everything fits in size, you can move on to the next item. But it is worth taking the size responsibly because if they are not calculated correctly, the drawing will not work out right and beautiful. So double-check:

Photo 3. Our rectangle we will use as the basis for the face. Top draw a slightly rounded up line. The right side will be located lower than the left:

Photo 4. Use the eraser to remove the upper horizontal line of the rectangle. Lower round corners:

Photo 5. Doris you on top of a similar curved line. We make a notch for the cheeks:

Picture 6. Now we will build for the eyes. From the edge to the left and the right, we recede a floor of a centimeter and divide the segment into equal three parts. From the middle section, we drop down two lines, which will slightly diverge towards the bottom. At the bottom, we define the chin and make it rounded. The nose will be located in the middle of the face, and from nose to chin, we make a notch for the mouth:

Photo 7. Add large oval eyes. To the edge, they will be more pointed. On the nose, add holes. We can make the cheeks more “loose,” round them up:

Photo 8. Add a cap image. It will be drawing a bear and his ear on the right. Bends and small folds will be visible on the cap. On the left, check the vertical line. Detailing slightly line collar sweaters. There will be several of them. Do not spend too much attention to clothes. The main task for the portrait is the face:

Photo 9. We define the darkest places and hatch them. Take the eyes, the openings of the nose, the lines of the mouth, and the background to the left. A little direct outline of the face. It is worth remembering that its smooth lines distinguish the front of the baby. Above the eyes, we draw the eyelids with a thin line:

Photo 10. Determine the main direction and location of the shadow. The light will fall from the top right, which means the shadow will be located on the left. Grab the forehead, neck, left the side of the nose, cheeks, and chin:

Photo 11. Now using the shadow create a face shape. It is important to remember that the direction of the strokes helps to create volume. Add a shadow near the eyes, frontal part, and nose. But on the cheeks it is not worth much to lay shadows, because they stick out a little and receive a large amount of light:

Photo 12. Add strokes to the cap and eyelet. In parallel, we are working on the facial features and shadow on it:

Photo 13. We continue to work on the volume. At this stage, we will be able to prescribe clothing slightly, revealing folds on it:

Photo 14. We take a soft, simple pencil and add contrast. We pay special attention to the eyes, nose, and neck. Lips will be slightly compressed; it can be seen in the folds around them:

Photo 15. Make the strokes softer so that the drawing was more real:

Photo 16. Add contrast again. Let’s look at the picture as a whole and refine the missing stages. Figure completed:
So we learned to draw a child in pencil in stages. As you can see, drawing a kid is simple, and now you can repeat this lesson yourself. At the initial stage, I recommend to repeat the portrait of the child drawn in this article and then try to draw your baby or the baby of your relatives or acquaintances smile