How to draw curly hair step by step wakes told in this article!
Types of curly hair
Curly hair can range from light waves to tight coils. We will explain how to correctly determine a client’s curl type.
Classification of curl types
In the 1990s, renowned hairstylist Andre Walker, Oprah Winfrey’s personal stylist, developed a classification of hair types. It quickly became the standard in the beauty industry.
It divides hair into four main categories, where 1 is straight hair and 4 is very tight curls. Within categories 2–4, there is a division into subcategories based on curl diameter.
Type 2: wavy hair

2A — light S-shaped waves, almost straight.
2B — distinct S-shaped waves, slightly fluffy.
2C — large waves, prone to curling and fluffing.
Type 3: curly hair

3A — large loose curls with a pronounced curl.
3B — tight, bouncy curls.
3C — small, very tight curls, similar to corkscrews.
Type 4: very curly hair (tight curls)

4A — dense spiral curls.
4B — winding curls with a zigzag pattern.
4C — very dense small O-shaped curls, prone to severe dryness and brittleness.
Frizzy and Curly Hair are drawing instruction and step by step drawing tutorials for drawing Peoples Curly Hair. Learn how to draw and sketch the human hair.
Drawing curls is a hard job. However, I have put together a little guide to drawing spiral curls to help you ahead from now on. When it comes to creating realistic portraits and figures, essential techniques for drawing hair — counting different lengths, styles and texture — is essential. If you’re a novice, this may seem like a daunting challenge — especially since this task can take longer than any other part of a drawing.
Hair is tough to draw, because what we observe is dissimilar than what we recognize. You can’t just draw all the hairs in the form of the outline, because that’s not what we perceive when we look at hair. What we see must be simplified to lines and shades, and there are many ways to do it.
In this lesson, I will show you one of these ways—a simple method that’s great for quick rendering and sketches.
How to draw curly hair easy ( option 1)

Step 1
The first step in drawing curly hair is to sketch the oval of the head!

Step 2
Next, draw the girl’s face as you wish (or you can just leave the oval as it is, if you prefer)!

Step 3
The next step is to draw a single curl and the base of the hair split!

Step 4
Next, draw the next curl!

Step 5
We also draw curls on the forehead and going to the right along the top of the hair!

Step 6
Here we draw the next two curls!

Step 7
And we continue to draw in order, touching not only the right side of the head, but also trying to draw the left side of the head!

Step 8
Draw two sets of three curls on the right side of the head and on the left side as well!

Step 9
Next, we create the next part of the curls!

Step 10
At this stage, we draw a couple more curls on our girl’s head!

Step 11
So let’s keep drawing curls at the same pace!

Step 12
Draw a few more curls on the right and left sides as well!

Step 13
Here we finish drawing the curls and also draw the girl’s ear!

Step 14
Let’s draw clothes for our girl as we wish!
How to draw curly hair simple( option 1)
Step 1

In this small pencil drawing lesson, we will learn the basics of curly and curly hair.
Below are three different types of curls; wavy, curly and heavily curled.
Step 2
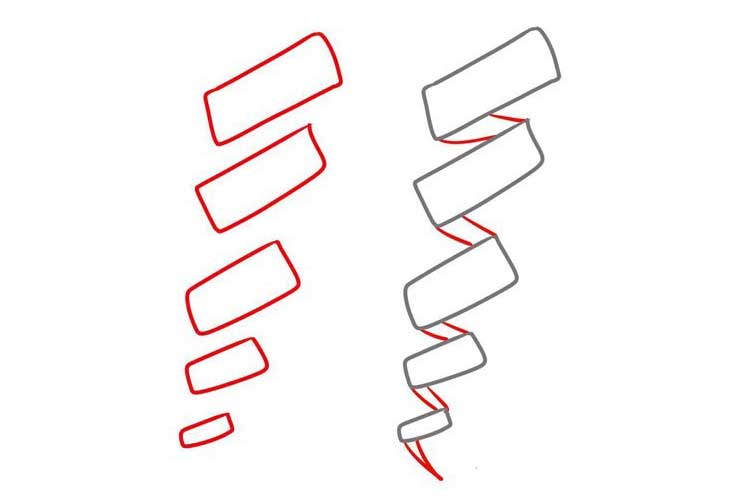
If it is difficult for you to draw curly or heavily curled strands, lay them out into several simple steps.
To begin with, draw diagonal rectangles that will shrink to the bottom. And then connect the lines, as in the second scheme.
Step 3
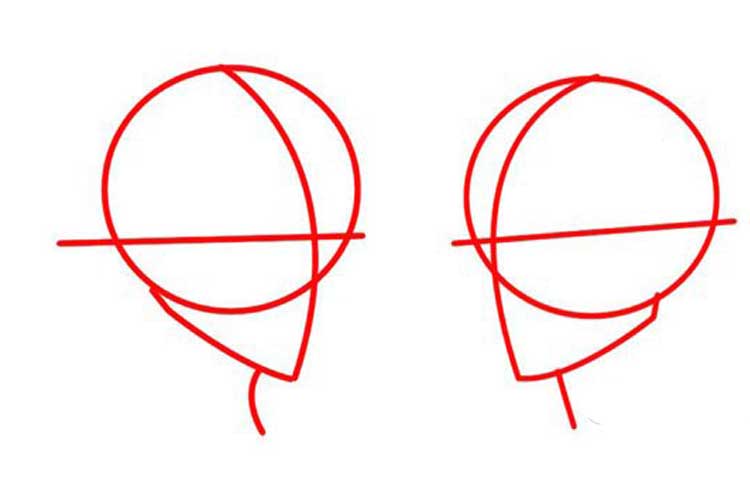
Now we will try to draw such strands in practice. We draw the main shape of the head.
We consider two examples of drawing hair, one with waves, and the other mixed curly and wavy.
Step 4

Draw a face: eyes, nose and mouth.
I decided to look over my shoulder, so I added a neck and shoulders.
Step 5

Draw a bang. If you scribbled auxiliary hairline, you could easily see where to draw a blow.
Step 6

From the bangs add two strands that will hang on the sides of the face.
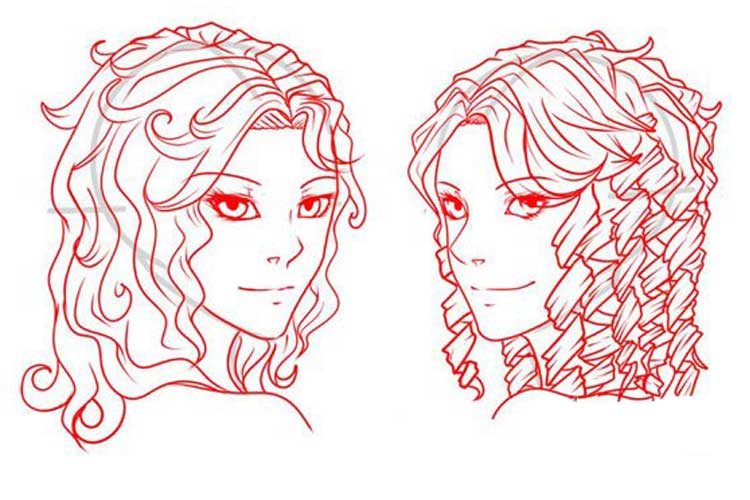
Now, by strands, we can already determine which girl will have wavy and which curly.
From the bangs add two strands.
Step 7

Add details. We draw small lines on the strands and points to show the direction of the hair. You can add hairlines as much and as little.
Step 8

Now add the hair to the back in the same way as the side strands. I prefer to start from this stage, and not from the central part of the hair, as it sets the parameters of the head.
Notice that the hair is rather bulky on the head, this is because natural curls start to curl from the roots of the head.
The girl on the left side of the ends of the strands curled into a circular. So drawing is not necessary, only if you want.
Step 9

Now add the hair in the middle. Add curls until we fill the entire empty gap.
Step 10
Now let’s do the upper part of the head. Remember that the hair does not fit firmly to the skull, but it is not as far as at the bottom (due to severity).
Add from the parting hairline in the direction.
At this point, you can finish or add colour.
let’s do the top of the head
Step 11
Below I will show my method of hair dyeing process. I will not go into details but will describe in a few extra steps.
1) apply the primary colour.

2) Add the main shadows. Notice how the girl’s hair is darkened on the right side (each curl ring is darkened on both sides).

3) Glare. Add a light colour on every ‘growth’ of hair. With the waves, its top of each punch, on the rings, its centre of each curl.

4) Mix in any way you like and add more shadows.

That’s all ready! I hope this lesson helps you.


