Lantern drawing in 2 variants will tell in this article! History of the development of street lighting first mention goes back to 1417 in London on the instructions of the mayor posted the first street lamps;
in the early 16th century in Paris, the inhabitants of the city were obliged to put lights on the windows that faced the street, thus creating artificial lighting;
in 1668, in Amsterdam, the fire chief Jan Van der Heyden developed the first oil street lamp.
Subsequently, he also proposed and implemented a street lighting system in the city, which involved the installation of 2,500 lanterns. This reduced crime in the city, made it easier to act in case of fire and helped citizens avoid falling into canals at night.
Oil lanterns were widely used despite their dim light until 1840. More modern lanterns then replaced them. In 1682, Berlin implemented a street lighting system borrowed from Amsterdam. Street lighting is part of contemporary life; it is needed everywhere, from the city to the small village. Its primary function is to create an artificial light flux that meets regulatory requirements and provides the necessary level of safety on roads and pedestrian areas at night.
Lantern drawing is easy; the main thing is to follow our recommendations! Utilitarian urban street lighting uses lampposts, supports with cantilever lights, and lighting masts. In the case of planning decorative lighting, various decorative fixtures with different degrees of illumination, color, shape, and location are used.
Subsequently, he also proposed and implemented a street lighting system in the city, which involved the installation of 2,500 lights. This reduced the level of crime in the city, facilitated action in case of fire, and helped the citizens not to fall into the canals at night.
Requirements for street light bulbs:
- Street light bulbs are responsible for traffic safety, so the following parameters are important when selecting them:
- ease of maintenance and replacement of a burned-out lamp;
- at least IP65 degree of protection against dust and moisture;
- high resistance to temperature fluctuations and wind gusts;
- low level of electricity consumption while maintaining a high luminous flux;
- durability in operation.
Horizontal illumination is the main parameter characterizing the light flux falling from the luminaire on the surface (road, sidewalk, crosswalk, etc.).
The value of illuminance is measured by a lux meter. Normative values, calculation methods, and parameters of lighting devices are prescribed for each site.
Let’s start Lantern drawing immediately!
Lantern Drawing Easy (option 1)

Step 1
First, we create the base of the lantern in the form of a rectangle with angular sides!

Step 2
Next, we draw a rectangle with straight sides. This will be the base of our lantern!

Step 3
At this stage, we create a sort of neck for the jar, which will also serve as the base of the lantern, only its higher part!

Step 4
At this stage, we draw the lantern handles, or rather its base!

Step 5
Here we draw a wire to hold the flame in the lantern!

Step 6
Let’s keep drawing the top part of the lantern by making its sides!

Step 7
Here we draw the central part of the lantern, its bank base for the flame holder!

Step 8
At this stage, we create the upper part of the lantern in the form of a “jar” with a lid!

Step 9
Decorate the top of the lantern beautifully with circles and slits!

Step 10
Let’s make a hand holder in the form of a curved wire!

Step 11
Let’s start by drawing our lantern dark blue!

Step 12
We also drawing the upper part of the lantern dark blue!

Step 13
And we drawing the central part of the lantern in bright yellow!

Step 14
Finish drawing the sides of the lantern in dark blue and yellow!
Lantern Drawing Simple (option 2)

YOU WILL CERTAINLY REQUIRE:
A paper;
pencil;
eraser;
leader;
1
Frame.
Draw two vertical lines. They ought to be close together. After that, attach them on top as well as the base.

2
Base support.
To maintain the lantern from falling over, make its base a little broader. Make use of a ruler to remedy the structure near the bottom.

3
Installing plate
Thanks to the plate, the lights are affixed to the framework. This is additionally where the cords that carry out electricity are attached. The part appears like a small battery.

4
Top
Because we are drawing a vintage lantern, the top of it is enhanced with lovely iron details.

5
Lanterns
Illustrate the lanterns themselves as tiny blossom pots.

How to draw a classic light They are at the level of the installing plate. Use a ruler to measure the distance of the parts and illustrate them correctly.

The shapes portrayed are the lantern panes. Draw strange “hats” on top of the lights, which protect the lamps from rainfall and hostile climate.

6
Connecting

Link the lights to the home plate with ornate details.
The add-on must be the same. You can likewise think of various other link alternatives.

7
Enhancing
Don’t neglect to decorate the light with curved details.

These can also be little flowers or leaves.
8
Drawing
Vintage lanterns were made in dark colors. Each item can be repainted in a different color. Make the lanterns yellow.
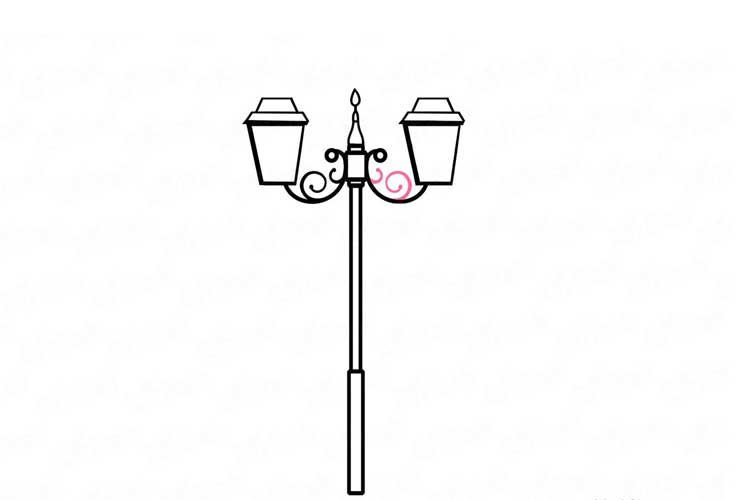
Lantern Drawing Simple (option 2)

To complete the drawing of the lantern, you need to depict its stand beautifully and realistically. When thinking about how to draw a lantern in pencil, you should know that it consists of a bracket, a base, a top post, and a lamp. All these details should be reflected in your drawing; your lantern will turn out exciting and detailed.

Erase the parts of the lantern that do not turn out with an eraser, don’t be afraid to make mistakes. As a rule, step-by-step drawing is not wildly inaccurate. Try to repeat your picture after the artist. Take your time, and draw confidently and accurately.

It is worth starting with the stand to give more detail to the lantern. The post should be symmetrical; the natural beauty of the street lamp depends on how beautiful it turns out. Straight and broken lines can be made entirely by hand or with the help of a ruler.

From the lantern post, which we already have, we draw a bracket at the bottom. It will hold our stand firmly in place and keep it from falling. Don’t draw the rack too narrow or wide; as a rule, it is medium broad. Don’t forget to remove the light bulb inside the lantern.

To decorate the lantern, we also need to trim the bracket. The picture below shows one decoration option, but if you want, design your street lantern decoration. The frame can be decorated however you like.


